Get familiar with CESM and the computing environment
Overview
Teaching: 30 min
Exercises: 60 minQuestions
How to setup CESM on Saga?
How to run a CESM case?
How to monitor my CESM case?
What does CESM produce?
What is netCDF data format?
How to quickly inspect and visualize netCDF data files?
Objectives
Learn to setup CESM on Saga
Learn to run and monitor a simple cesm case on Saga
Learn about netCDF data format
Learn to inspect a netCDF file
Learn to quickly visualize a netCDF file
First practical: get familiar with cesm

We do all the practicals on Saga.
- Notur Initialization
- Create a New case
- Running a case
- Monitor your test run
- First look at your 1 month test run
Notur Initialization
Make sure you have set up your SSH keys properly and you can transfer files with scp without entering your password. If not go here.
To run CAM-6 on Saga, we will use:
- Fortran and C compilers (intel 2018b compilers)
- NetCDF library (netcdf4.4.4)
- MPI (intel openmpi 2018b)
To be able to compile and run CESM on Saga, no changes to the source code are necessary; we just have to adapt a few scripts for setting the compilers and libraries used by CESM.
To simplify and allow you to run CESM as quickly as possible, we have prepared a ready to use version of cesm. It means all the machine specific configuration files for running CESM on Saga have been added.
On Saga:cd $HOME
module use /cluster/projects/nn1000k/modulefiles
module load cesm/2.1.0
link_dirtree /cluster/projects/nn1000k/cesm/inputdata /cluster/work/users/$USER/inputdata
The commands above allows you to set up your environment (PATH, Libraries, etc.) to use cesm 2.1.0.
All the input data necessary to run our model configuration is in /cluster/work/users/$USER/inputdata (where $USER is your login username on saga). Input data can be large this is why we create symbolic links instead of making several copies (one per user). The main copy is located in /cluster/projects/nn1000k/cesm/inputdata.
Create a New case
The CESM source code is in /cluster/projects/nn1000k/cesm/, and you can have a first look at the code.
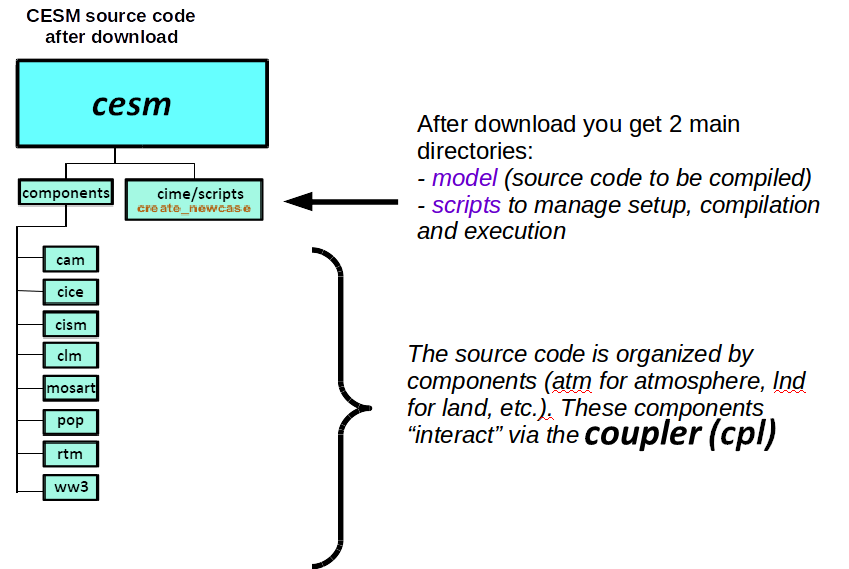
We will build and run CAM in its standalone configuration i.e. without having all the other components active.
The basic workflow to run the CESM code is the following:
- Create a New Case
- Invoke
case.setupto setup your newly created case - Build the Executable (
case.build) - Run the Model and Output Data Flow (
case.submit)
To create a new case, we will be using create_newcase script.
There are many options and we won’t discuss all of them. The online help provides information about how get the full usage of create_newcase.
create_newcase --help
Command not found
If you get an error when invoking
create_newcasemake sure you have loaded cesm in your environment:module use /cluster/projects/nn1000k/modulefiles module load cesm/2.1.0
The 4 main arguments of create_newcase are explained on the figure below: 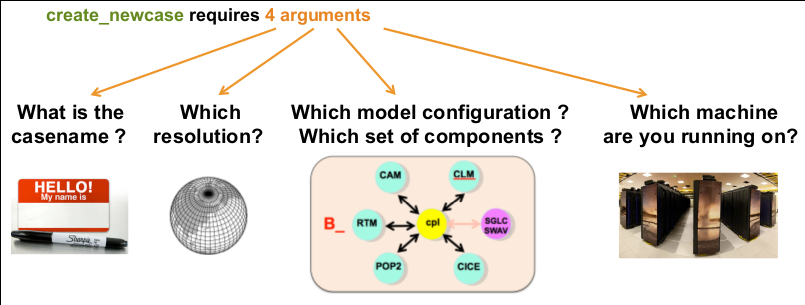
#
# Simulation 1: short simulation
#

module use /cluster/projects/nn1000k/modulefiles
module load cesm/2.1.0

create_newcase --case $HOME/cases/F2000climo-f19_g17 --res f19_g17 --compset F2000climo --mach saga --run-unsupported --project nn1000k
- case: specifies the name and location of the case being created. It creates a new case in
$HOME/casesand its name isF2000climo-f19_g17 - res: specifies the model resolution (resolution of the grid). Each model resolution can be specified by its alias, short name or long name:
- alias: f19_g17 (atm/lnd_ocn/ice)
- non-default grids are: atm:1.9x2.5 lnd:1.9x2.5 ocnice:gx1v7
- mask is: gx1v7
- 1.9x2.5 is FV 2-deg grid: with domain file(s):
- domain.lnd.fv1.9x2.5_gx1v6.090206.nc (only for mask: gx1v6 grid match: atm/lnd)
- domain.ocn.1.9x2.5_gx1v6_090403.nc (only for mask: gx1v6 grid match: ocnice)
- domain.lnd.fv1.9x2.5_gx1v7.181205.nc (only for mask: gx1v7 grid match: atm/lnd)
- domain.ocn.fv1.9x2.5_gx1v7.181205.nc (only for mask: gx1v7 grid match: ocnice)
-
domain.aqua.fv1.9x2.5.nc (only for mask: null grid match: ocnice)
- gx1v7 is displaced Greenland pole 1-deg grid with Caspian as a land feature: with domain file(s):
- $DIN_LOC_ROOT/share/domains/domain.ocn.gx1v7.151008.nc (only for grid match: atm/lnd)
- $DIN_LOC_ROOT/share/domains/domain.ocn.gx1v7.151008.nc (only for grid match: ocnice)
The full list of supported grid is given here.
- compset: specifies the component set, i.e., component models, forcing scenarios and physics options for those models.
As for the resolution, the component set can be specified by its alias, short name or long name: - alias: F2000climo
- long name: 2000_CAM60_CLM50%SP_CICE%PRES_DOCN%DOM_MOSART_CISM2%NOEVOLVE_SWAV
The notation for the compset longname is:
TIME_ATM[%phys]_LND[%phys]_ICE[%phys]_OCN[%phys]_ROF[%phys]_GLC[%phys]_WAV[%phys][_BGC%phys]
The compset longname has the specified order: atm, lnd, ice, ocn, river, glc wave cesm-options.
Where:
- Initialization Time: 2000
- Atmosphere: CAM60 CAM cam6 physics
- Land: CLM50%SP clm5.0:Satellite phenology
- Sea-Ice: CICE%PRES Sea ICE (cice) model version 5 :prescribed cice
- Ocean: DOCN%DOM DOCN prescribed ocean mode
- River runoff: MOSART MOSART: MOdel for Scale Adaptive River Transport
- Land Ice: CISM2%NOEVOLVE cism2 (default, higher-order, can run in parallel):cism ice evolution turned off (this is the standard configuration unless you’re explicitly interested in ice evolution):
-
Wave: SWAV Stub wave component
The list of available component set is given here.
- mach: specifies the machine where CESM will be compiled and run. We will be running CESM on Saga (a set of scripts for Saga can be found in
/cluster/projects/nn1000k/cesm/cime/config/cesm/machines)
Now you should have a new directory in $HOME/cases/F2000climo-f19_g17 corresponding to our new case.
cd $HOME/cases/F2000climo-f19_g17
Check the content of the directory and browse the sub-directories:
- CaseDocs: namelists or similar
- SourceMods: this is where you can add local source code changes.
- Tools: a few utilities (we won’t use them directly)
- Buildconf: configuration for building each component
For this tests (and all our simulations), we do not wish to have a “cold” start and we will therefore restart and continue an existing simulation we have previously run.
On Saga:./xmlchange RUN_TYPE=hybrid
./xmlchange RUN_REFCASE=F2000climo.f19_g17.control
./xmlchange RUN_REFDATE=0014-01-01
We use xmlchange, a small script to update variables (such as RUN_TYPE, RUN_REFCASE, etc.) defined in xml files. All the xml files contained in your test case directory will be used by cesm_setup to generate your configuration setup (Fortran namelist, etc.).
On Saga:ls *.xml
If we do not want the dates to start from 0001-01-01 we need to specify the starting date of our test simulation.
On Saga:./xmlchange RUN_STARTDATE=0014-01-01
We are also going to change the duration of our test simulation and set it to 1 month only.
On Saga:./xmlchange STOP_N=1
./xmlchange STOP_OPTION=nmonths
Now we are ready to set-up our model configuration and build the cesm executable.
On Saga:./case.setup
./case.build
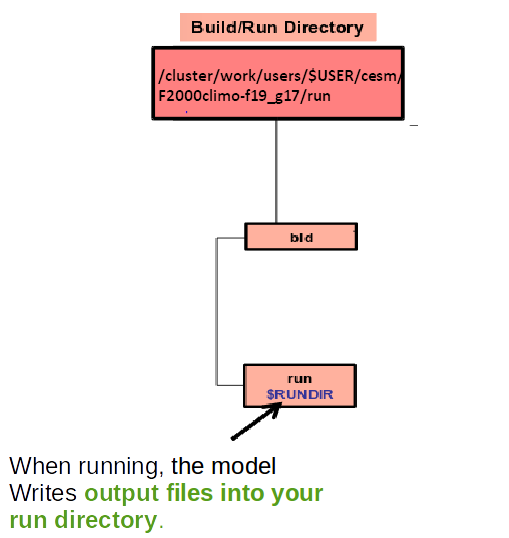
After building CESM for your configuration, a new directory (and a set of sub-directories) are created in /cluster/work/users/$USERS/cesm/F2000climo-f19_g17:
- bld: contains the object and CESM executable (called cesm.exe) for your configuration
- run: this directory will be used during your simulation run to generate output files, etc.
Running a case
Namelists can be changed before configuring and building CESM but it can also be done before running your test case. Then, you cannot use xmlchange and update the xml files, you need to directly change the namelist files.
The default history file from CAM is a monthly average, and this is what we are going to use in this lesson.
However, it is possible to change the output frequency with the namelist variable nhtfrq
- If nhtfrq=0, the file will be a monthly average
- If nhtfrq>0, frequency is input as number of timesteps.
- If nhtfrq<0, frequency is input as number of hours.
For instance if we wanted to change the history file from monthly average to daily average, we would have to set the namelist variable nhtfrq to -24.
cat is a unix shell command to display the content of files or combine and create files. Using » followed by a filename (here user_nl_cam) means we wish to concatenate information to a file. If it does not exist, it is automatically created. Using « followed by a string (here EOF) means that the content we wish to concatenate is not in a file but written after EOF until another EOF is found.
Finally, we have to copy the control restart files (contains the state of the model at a given time so we can restart it). The files are stored on NIRD (they were generated from a previous simulation where the model was run for several years).
On Saga:cd /cluster/work/users/$USER/cesm/F2000climo-f19_g17/run
wget https://zenodo.org/record/3702975/files/F2000climo.f19_g17.control.rest.0014-01-01-00000.tar.gz
tar zxvf F2000climo.f19_g17.control.rest.0014-01-01-00000.tar.gz
mv 0014-01-01-00000/* .
Now we wish to run our model and as it may run for several days, we need to use the batch scheduler (SLURM) from Saga. Its role is to dispatch jobs to be run on the cluster. It reads information given in your job command file (named here .case.run). This file contains information on the number of processors to use (ntasks), the amount of memory per processor (mem-per-cpu) and the maximum amount of time you wish to allow for your job (time).
Check what is in your current job command file (.case.run).
On Saga:head .case.run
#!/usr/bin/env python
# Batch system directives
#SBATCH  --job-name=F2000climo-f19_
#SBATCH  --nodes=2
#SBATCH  --ntasks-per-node=40
#SBATCH  --output=F2000climo-f19_
#SBATCH  --exclusive
#SBATCH  --mem-per-cpu=4G
#SBATCH  --ntasks=80
#SBATCH  --export=ALL
The lines starting with #SBATCH are not comments but SLURM directives.
You can now submit your test case.
./xmlchange --subgroup case.run JOB_WALLCLOCK_TIME=01:00:00
./case.submit
Why chaning
JOB_WALLCLOCK_TIME?Adjusting the wall clock time for short runs (as here for running 1 month) will allow us to reduce the queuing time.
Monitor your test run
The script “case.submit” submits two jobs (one for running the model and one for the short term archive e.g. storing data for future analysis) to the job scheduler on Saga. More information can be found here.
To monitor your job on Saga:
squeue -u $USER
It will return something like:
JOBID PARTITION     NAME     USER ST       TIME  NODES NODELIST(REASON)
444258    normal F2000cli  annefou PD       0:00      2 (None)
444259    normal F2000cli  annefou PD       0:00      1 (Dependency)
- USER: here you will find your user name (rather than annefou)
- ST: this is the status of your job. **PD means pending e.g. the job is waiting in the queue. When running you will get R.
- NODES: The number of nodes (here 2 for the first job and 1 for the second).
- NODELIST(REASON): the list of nodes. It is only effective when your job is running.
Full list of available commands and their usage can be found here.
First look at your 1 month test run
On Saga during your test case run, CAM-6 generates outputs in the “run” directory:
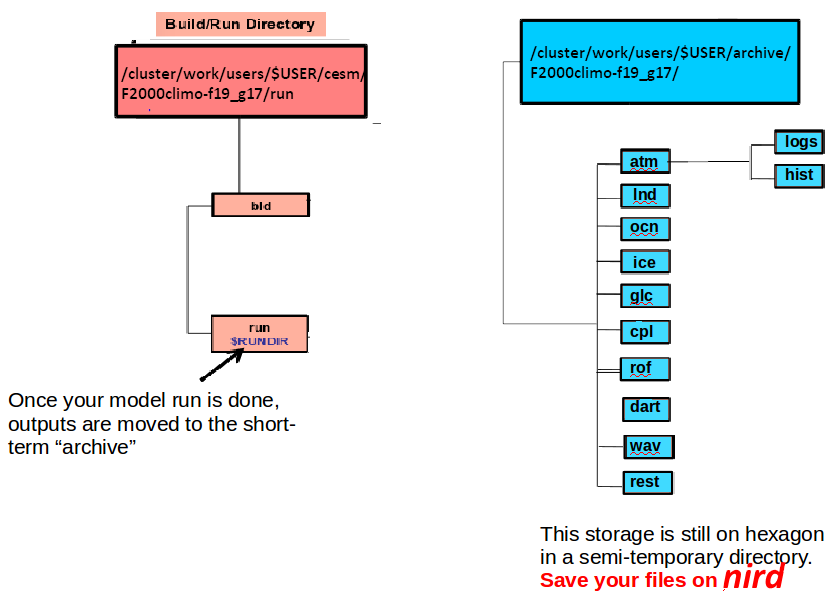
At the end of your experiment, the run directory will only contain files that are needed to continue an existing simulation but all the model outputs are moved to another directory (archive directory). On Saga this directory is semi-temporary which means data will be automatically deleted after a short period of time.
Check your run was successful and generated all the necessary files you need for your analysis.
cd /cluster/work/users/$USER/cesm/F2000climo-f19_g17/run
ls -lrt
cd /cluster/work/users/$USER/archive/F2000climo-f19_g17/atm/hist/
ls -lrt
What is a netCDF file?
Netcdf stands for “network Common Data Form”. It is self-describing, portable, metadata friendly, supported by many languages (including python, R, fortran, C/C++, Matlab, NCL, etc.), viewing tools (like panoply, ncview/ncdump) and tool suites of file operators (in particular NCO and CDO).
Inspect a netCDF file
NetCDF files are often too big to open directly (with your favorite text editor, for instance), however one can look at the content of a netCDF file instead, for example to dump the header of one of the netCDF history files.
On Saga:module load netCDF/4.6.1-intel-2018b
cd /cluster/work/users/$USER/archive/F2000climo-f19_g17/atm/hist/
ncdump -h F2000climo-f19_g17.cam.h0.2000-06.nc
netcdf F2000climo-f19_g17.cam.h0.2000-06 {
dimensions:
        lat = 96 ;
	lon = 144 ;
	time = UNLIMITED ; // (1 currently)
        nbnd = 2 ;
        chars = 8 ;
        lev = 32 ;
        ilev = 33 ;
variables:
        double lat(lat) ;
                lat:_FillValue = -900. ;
                lat:long_name = "latitude" ;
                lat:units = "degrees_north" ;
        double lon(lon) ;
                lon:_FillValue = -900. ;
                lon:long_name = "longitude" ;
                lon:units = "degrees_east" ;
        double gw(lat) ;
                gw:_FillValue = -900. ;
                gw:long_name = "latitude weights" ;
    ....
Key Points
CESM
High-Performance Computing
Saga
SLURM
netCDF
ncdump
ncview