In this document you will find information on:
- Where and how to save your notebooks?
- Some ideas for good reports
- Notebooks Hyytiala 2017
- Report delivery and peer-review
- How to generate your report
- Make your report citable
Notebooks Andoya 2018
Students’ notebooks can be stored here.
To be able to upload your jupyter notebook in this repository you need:
- Get added as a collaborator to the repository (we need your github username)
- Clone the repository on NIRD (login.nird.sigma2.no):
# Create new directory. Please note that adding -p parameter makes it
# robust (if the directory already exists, it is not re-created but
# the command does not fail
mkdir -p /projects/NS1000K/NEGI-Andoya/students/$USER

# Change directory
cd /projects/NS1000K/NEGI-Andoya/students/$USER
clone
# You should clone this repository once only
git clone git@github.com:NordicESMhub/NEGI-Andoya-2018.git
If you get permission denied (publickey) when cloning NEGI-Andoya-2018 on nird (login.nird.sigma2.no or login1.nird.sigma2.no):
- Checking for existing SSH keys
- Generating a new SSH key This stage is only necessary if you do not have SSH keys yet (see 1).
- Add your NIRD ssh keys to your github account: please note that the command
clipdoes not exist on nird so instead usecat:
cat $HOME/.ssh/id_rsa.pub
and copy its content (using your mouse) and paste it in github (settings –> SSH and GPG keys).
Once your SSH keys are added to your github account, clone NEGI-Andoya-2018 repository and follow the next steps.
cd NEGI-Andoya-2018
# switch to the master branch where we store notebooks
git checkout master
# change directory (cd) to notebooks directory
cd notebooks
mkdir -p $USER
Then locate your jupyter notebook on NIRD and copy it to the directory above. Let’s say our jupyter notebook is called report_$USER.ipynb and our notebook is in /projects/NS1000K/NEGI-Andoya/students/$USER/ so to copy it we need to use the following command:
cd /projects/NS1000K/NEGI-Andoya/students/$USER/
cp report_$USER.ipynb NEGI-Andoya-2018/notebooks/$USER/.
Then you need to add it to your local repository.
# stage your jupyter notebook into the Git stating area
cd /projects/NS1000K/NEGI-Andoya/students/$USER/NEGI-Andoya-2018/notebooks/$USER
git add report_$USER.ipynb
# commit your changes; -m option allows you to add a comment
git commit -m "added jupyter notebook for my report"
# push your local change to the remote repository in the master branch
# do not forget to fetch any possible changes before pushing yours.
git pull
git push origin master
Tips: if you get permission denied or a similar error message, this may be due to your SSH public key that is not stored properly on your Github account. See setup instructions for more information.
Some ideas for good reports
General structure
- Project title
- Name, email, course title, date, group assistant
- Abstract (1/2 page max)
- Introduction (1 page)
- Method
- Packages used
- Datasets (models and observations)
- Analysis method
- …
- Results
- Discussion and outlook (1 page)
- Conclusions (1/2 page)
- References
- Acknowledgments
- model and data owners/providers
- Sigma-2 (project NS1000K)
- Supplementary material
Some more tips
- Introduction
- Why am I studying this topic?
- What are my hypothesis?
- What is done in this notebook?
- Some background (on models and observations) and underlying theory (check for 2-3 papers with assistants and teachers if needed)
- Present equations if needed (Latex)
- Method
- Include (cleaned-up) analysis code for reproducible science
- Move all un-needed routines/code to supplement
- Include line-breaks in your code (for better export to PDF)
- Comment your code
- Results
- Focus on main analysis steps and findings
- Remove intermediate results or move to supplement
Figures
- Figure caption
- Don’t forget units, legends, and panel labels!
- Focus on main results/findings and remove intermediate figures

Report delivery and peer-review
Peer-review of preliminary by fellow students (selected by lottery)
- Timeline:
- Send to student peer one week after course end (deadline 9. Nov)
- Deadline for sending comments back to fellow student (deadline 16. Nov):
- General comments & specific comments (line-by-line)
- Final version to assistant (cc: Michael, Paul and github) (deadline 23. Nov)
- Feedback by 7th of December
Final version: PDF and jupyter notebook (with name in file, e.g. NeGIcourse_2018_NAME.pdf)
How to generate your report
Add jupyter notebook extensions
In the address of your jupyter notebook (local or jupyterhub), add nbextensionsat the end:
https://eclimate.uiogeo-apps.sigma2.no/user/df0bb829-8d2d-487e-9748-cf1b58c1ab4b/nbextensions

Please note that the long string starting with df0b is unique for each user and only appears on the jupyterhub instance.
Generate your report with command line
jupyter nbconvert --to pdf report_$USER.ipynb
or using nbpublish:
nbpublish -f latex_ipypublish_all -pdf report_$USER.ipynb
nbpublish can be called directly from your jupyter notebook (see example in the master branch notebooks/examples/report_example).
There are several options (not only latex_ipypublish_all) to generate and customize what you would like to see in your report. An example on how to:
- add a title, author, logo
- label your figures and reference them in markdown cells,
is given in the master branch and notebooks/examples/report_example
- Check the documentation and do not hesitate to ask for help!
- See example in the master branch (notebooks/examples/report_example)
- See an example from NEGI 2017 (last year) in the master branch too (presentations/ExampleNotebookNegi2017)
- And do not hesitate to contact us if you have any problems (create an issue in github).
Make your report citable
You may want to publish your report and get a DOI. This can be achieved using a Data archive in your University or you may use the data archiving tool Zenodo.
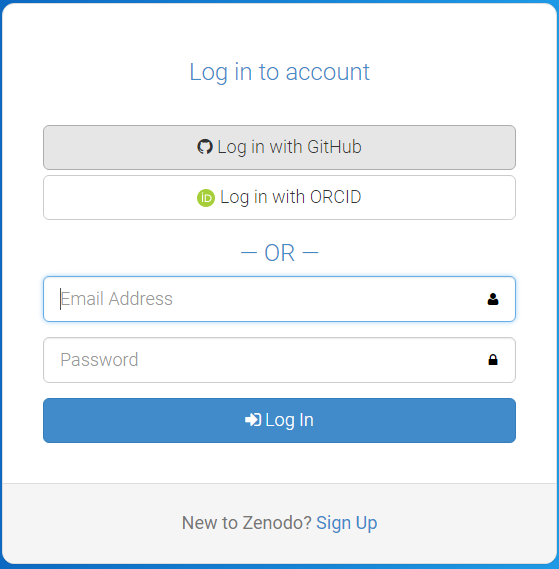
Login to Zenodo
- Go to https://zenodo.org/ and click on
Log in(notSign up) - Choose
Log in with GitHub
- Zenodo will redirect you back to GitHub and ask you to give Zenodo the permissions it needs. click
Authorize Application:

Source: https://guides.github.com/activities/citable-code/zenodo-authorize.png
Upload your report to Zenodo to get a DOI
- Click on “Upload” as shown in the figure below
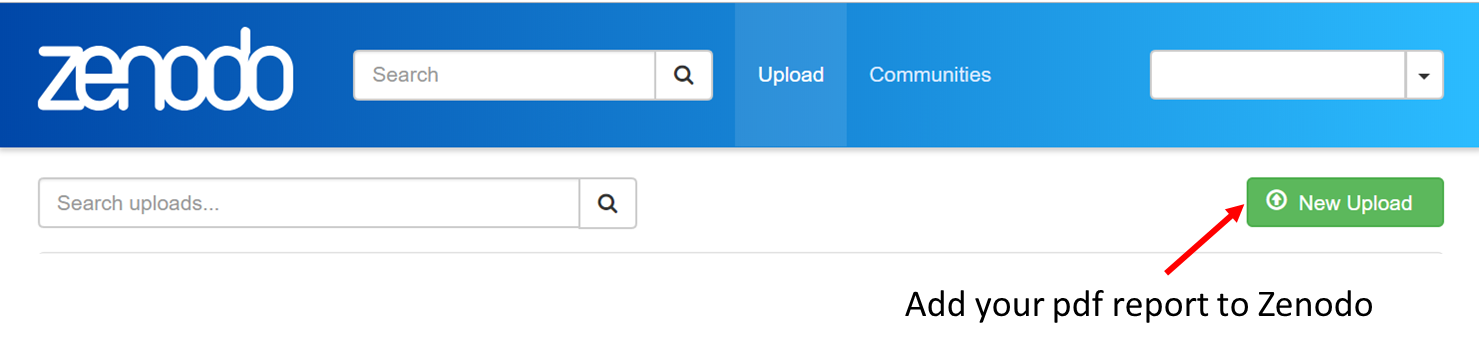
- Click on “Choose files” and upload your pdf report
- Click on “Reserve DOI (see figure below)
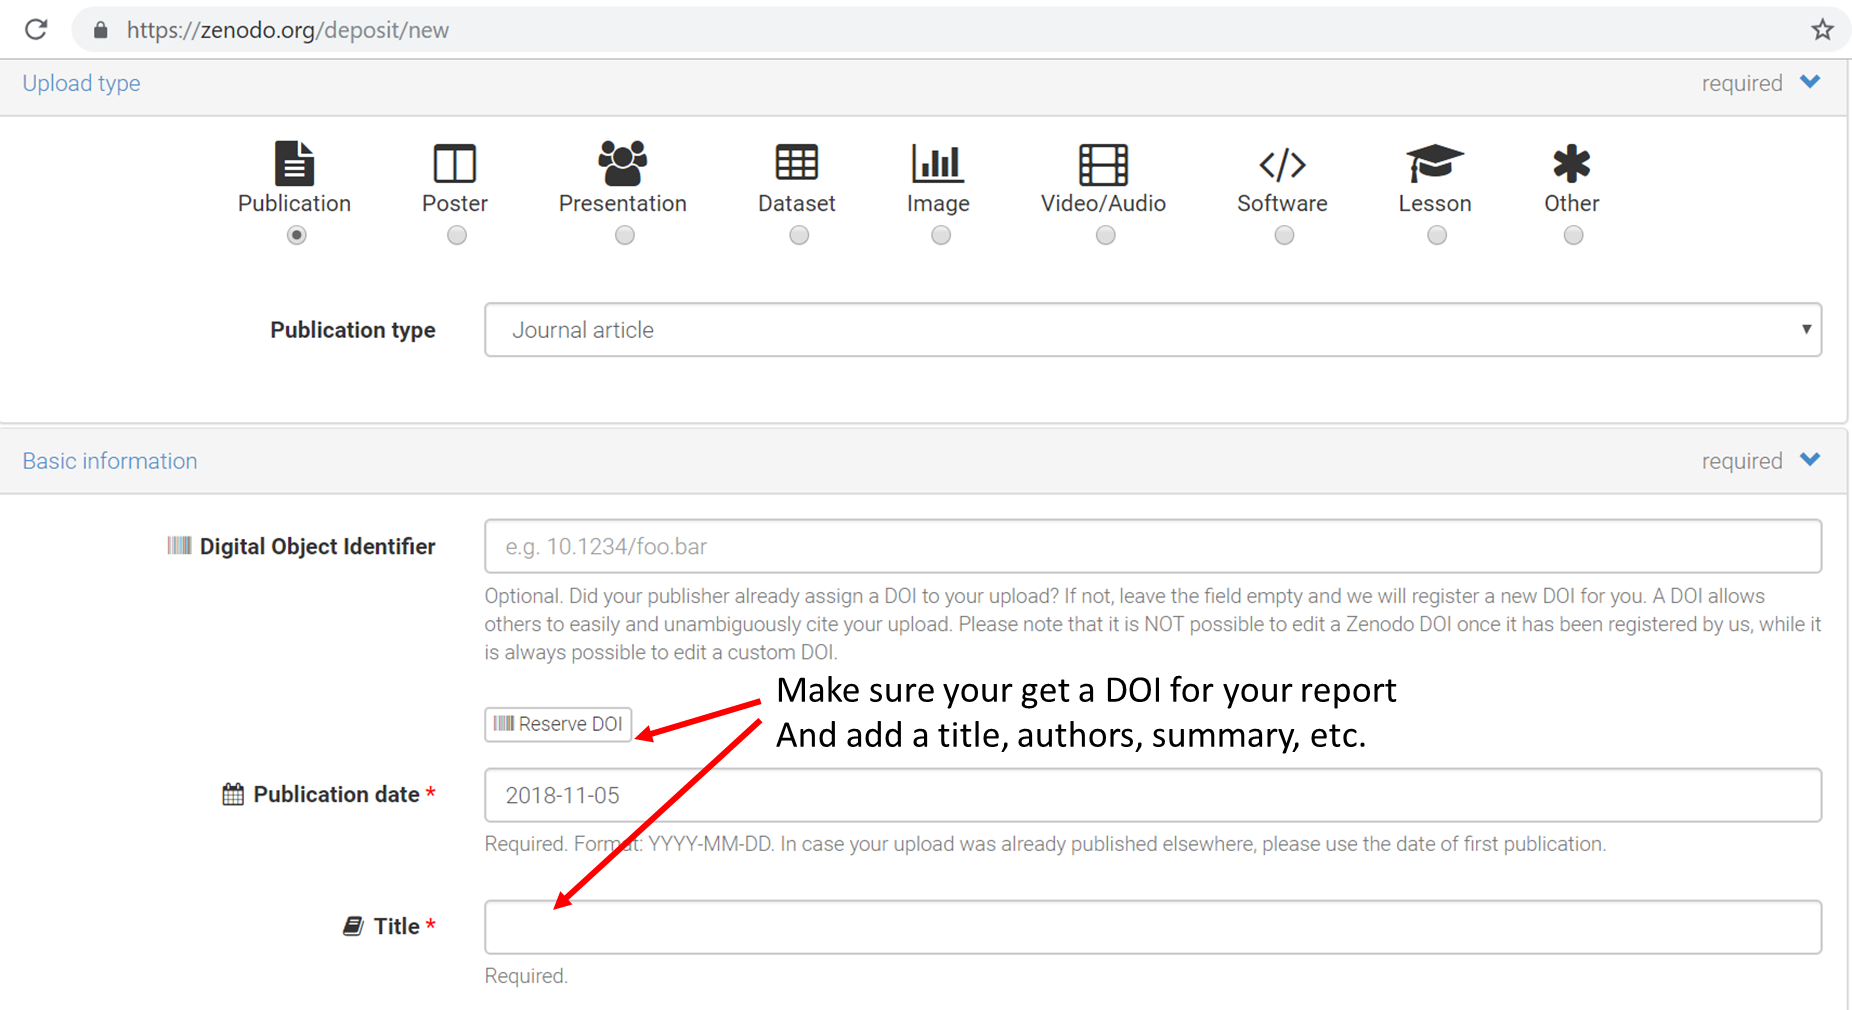
- Add metadata (title, authors, summary, etc.)
- Click on “Publish”
Add your DOI badge in your README file
Once published, you can get your Zenodo DOI Badge and add it in a “README” file in your notebook folder in github (master branch; notebooks/$USER/README). If this file does not exist, you can create it.
Create a GIF from PNG files
To create a GIF from several PNG files you run the command below in the terminal. In the terminal, go to the folder where the PNG files are stored and run the command. Make sure that the PNG file names are so that they are listed in the right order! It will just work through the files from top to bottom.
With the -delay argument you can make the GIF slower (bigger number = slower GIF).
convert -delay 10 -loop 0 *.png namefile.gif