Organize and distribute a Python package
Overview
Teaching: 0 min
Exercises: 0 minQuestions
What license for Python projects?
How to organize and distribute a python package on pypi?
How to distribute a python package with conda?
How do Python projects deploy their documentation?
What is DevOps?
Objectives
Making sense of Software licensing
Software licensing is a complicated topic, but crucial when willing to share your code.
A software license is an agreement between users and the owners of a software program that allows users to do certain things that would otherwise be an infringement of copyright law.
The software license usually answers questions such as:
- Where and how and how often can you install the program?
- Can you copy, modify, or redistribute it?
- Can you look at the underlying source code?
- The price of the software and the licensing fees, if any, is sometimes discussed in the license agreement, but usually it’s described elsewhere.
For this section, we will use the CodeRefinery slides.
Social coding and open software
Software packaging
This section is from Python Packaging User guide.
Directory structure for projects
- It is good to keep all files associated with a project in a single folder
- Different projects should have separate folders
- Use consistent and informative directory structure
- If part public/part private/part secret, separate these by folder (and git repo)
- Add a README file to describe the project and instructions on reproducing the results
- Talk to others in the project about what you do. Write it down!
- But your mileage may vary, it’s not a one-size-fits-all
A project directory can look something like this:
project_name/
├── README.md			# overview of the project
├── data			# data files used in the project
│   ├── README.md		# describes where data came from
│   └── sub-folder/		# may contain subdirectories
├── processed_data/		# intermediate files from the analysis
├── manuscript/			# manuscript describing the results
├── results/			# results of the analysis (data, tables, figures)
├── source			# contains all code in the project
│   ├── LICENSE			    # license for your code
│   ├── requirements.txt	# software requirements and dependencies
│   ├── README.md	        # overview of the source folder
│   └── ...
└── doc/			# documentation for your project
    ├── mydocs.rst
    └── ...
Tracking source code, data and results
- All code is version controlled and goes in the
source/directory - Include appropriate LICENSE file and information on software requirements
- You can also version control data files or input files under
data/ - If data files are too large (or sensitive) to track, untrack them using
.gitignore - Intermediate files from the analysis are kept in
processed_data/ - Consider using Git tags to track specific versions of results (and/or the code that gives the particular results)
- version submitted to a journal, the dissertation version, the poster version, etc.
$ git tag -a <tagname> -m "comment"
- version submitted to a journal, the dissertation version, the poster version, etc.
- It’s a good idea to also put your manuscript under version control
- Git can be used to collaborate on manuscripts written in, e.g., LaTeX and other text-based formats but other tools exist:
Create a Python package
The Python source files are in source directory and now we will learn how to organize the source directory
to create a python package. We will discuss how to write the software documentation later.
- Create a new project called
deep_project:
mkdir deep_project
-
Add a
README.mdfile (the extension.mdcorresponds to a markdown file. To get some information on how to write markdown, visit this page. -
Create a
sourcedirectory:
mkdir -p deep_project/source
-
Add a
README.mdfile in thesourcefolder -
Choose a license and add it in the
sourcedirectory -
Create a new folder called
mypackagein the `source directory and change to this directory:
mkdir -p deep_project/source/mypackage
cd deep_project/source/mypackage
- Create a new
__init__.pyfile inmypackagefolder and add the following in it:
name = "mypackage"
The __init__.py files are required (in each folder with python code) to make Python treat the directories
as containing packages; this is done to prevent directories with a common name, such as string, from
unintentionally hiding valid modules that occur later (deeper) on the module search path.
In the simplest case, __init__.py can just be an empty file, but it can also execute initialization code for
the package or set the __all__ variable, described later.
- Create
setup.py
setup.py is the build script for setuptools. It tells setuptools about your package
(such as the name and version) as well as which code files to include.
Open setup.py and enter the following content.
import setuptools

with open("README.md", "r") as fh:
    long_description = fh.read()

setuptools.setup(
    name="mypackage-your-username",
    version="0.0.1",
    author="Example Author",
    author_email="author@example.com",
    description="A small example package",
    long_description=long_description,
    long_description_content_type="text/markdown",
    url="https://github.com/pypa/sampleproject",
    packages=setuptools.find_packages(),
    classifiers=[
        "Programming Language :: Python :: 3",
        "License :: OSI Approved :: MIT License",
        "Operating System :: OS Independent",
    ],
)
You should update the package name to include your username (for example, mypackage-annefou.
You can personalize the other values; for instance the url where you could add your github repository
for mypackage (we strongly suggest you use a version control to store your python code).
setup() takes several arguments. This example package uses a relatively minimal set:
- name is the distribution name of your package. This can be any name as long as only contains letters, numbers, _ , and -. It also must not already taken on pypi.org. Be sure to update this with your username, as this ensures you won’t run into any name collisions when you upload the package.
- version is the package version see PEP 440 for more details on versions.
- author and author_email are used to identify the author of the package.
- description is a short, one-sentence summary of the package.
- long_description is a detailed description of the package. This is shown on the package detail package on the Python Package Index. In this case, the long description is loaded from README.md which is a common pattern.
- long_description_content_type tells the index what type of markup is used for the long description. In this case, it’s Markdown.
- url is the URL for the homepage of the project. For many projects, this will just be a link to GitHub, GitLab, Bitbucket, or similar code hosting service.
- packages is a list of all Python import packages that should be included in the distribution package. Instead of listing each package manually, we can use find_packages() to automatically discover all packages and subpackages. In this case, the list of packages will be example_pkg as that’s the only package present.
- classifiers tell the index and pip some additional metadata about your package. In this case, the package is only compatible with Python 3, is licensed under the MIT license, and is OS-independent. You should always include at least which version(s) of Python your package works on, which license your package is available under, and which operating systems your package will work on. For a complete list of classifiers, see https://pypi.org/classifiers/.
There are many more than the ones mentioned here. See Packaging and distributing projects for more details.
-
Generating distribution archives and upload to PyPi
The next step is to generate distribution packages for the package. These are archives that are uploaded to the Package Index and can be installed by pip.
Make sure you have the latest versions of setuptools and wheel installed:
python3 -m pip install --user --upgrade setuptools wheel
Tip
You can also install these two packages using
conda
Now run this command from the same directory where setup.py is located:
python3 setup.py sdist bdist_wheel
This command should output a lot of text and once completed should generate two files in the dist directory:
dist/
  mypackage_your_username-0.0.1-py3-none-any.whl
  mypackage_your_username-0.0.1.tar.gz
The tar.gz file is a source archive whereas the .whl file is a built distribution. Newer pip versions
preferentially install built distributions, but will fall back to source archives if needed. You should
always upload a source archive and provide built archives for the platforms your project is compatible with.
In this case, our example package is compatible with Python on any platform so only one built distribution
is needed.
- Upload the distribution archives
Finally, it’s time to upload your package to the Python Package Index!
The first thing you’ll need to do is register an account on Test PyPI. Test PyPI is a separate instance of the package index intended for testing and experimentation. It’s great for things like workshops where we don’t necessarily want to upload to the real index. To register an account, go to
https://test.pypi.org/account/register/ and complete the steps on that page.
You will also need to verify your email address before you’re able to upload any packages. For more details on Test PyPI, see Using TestPyPI.
Now that you are registered, you can use twine to upload the distribution packages. You’ll need to install Twine:
python3 -m pip install --user --upgrade twine
As before, you can also use conda to install it.
Once installed, run Twine to upload all of the archives under dist:
python3 -m twine upload --repository-url https://test.pypi.org/legacy/ dist/*
You will be prompted for the username and password you registered with Test PyPI. After the command completes, you should see output similar to this:
Uploading distributions to https://test.pypi.org/legacy/
Enter your username: [your username]
Enter your password:
Uploading mypackage_your_username-0.0.1-py3-none-any.whl
100%|█████████████████████| 4.65k/4.65k [00:01<00:00, 2.88kB/s]
Uploading mypackage_your_username-0.0.1.tar.gz
100%|█████████████████████| 4.25k/4.25k [00:01<00:00, 3.05kB/s]
Once uploaded your package should be viewable on TestPyPI, for example, https://test.pypi.org/project/mypackage-your-username
- Install your newly uploaded package You can use pip to install your package and verify that it works. Create a new virtualenv (see Installing Packages for detailed instructions) and install your package from TestPyPI:
python3 -m pip install --index-url https://test.pypi.org/simple/ --no-deps mypackage-your-username
Make sure to specify your username in the package name!
pip should install the package from Test PyPI and the output should look something like this:
Collecting mypackage-your-username
  Downloading https://test-files.pythonhosted.org/packages/.../mypackage-your-username-0.0.1-py3-none-any.whl
Installing collected packages: mypackage-your-username
Successfully installed mypackage-your-username-0.0.1
Note This example uses --index-url flag to specify TestPyPI instead of live PyPI.
Additionally, it specifies --no-deps. Since TestPyPI doesn’t have the same packages as the live PyPI,
it’s possible that attempting to install dependencies may fail or install something unexpected. While our
example package doesn’t have any dependencies, it’s a good practice to avoid installing dependencies
when using TestPyPI.
You can test that it was installed correctly by importing the module and referencing the name property you put
in __init__.py earlier.
Run the Python interpreter (make sure you’re still in your virtualenv):
python
And then import the module and print out the name property. This should be the same regardless of what you
name you gave your distribution package in setup.py (in this case, mypackage-your-username) because your
import package is mypackage.
import mypackage

mypackage.name
'mypackage'
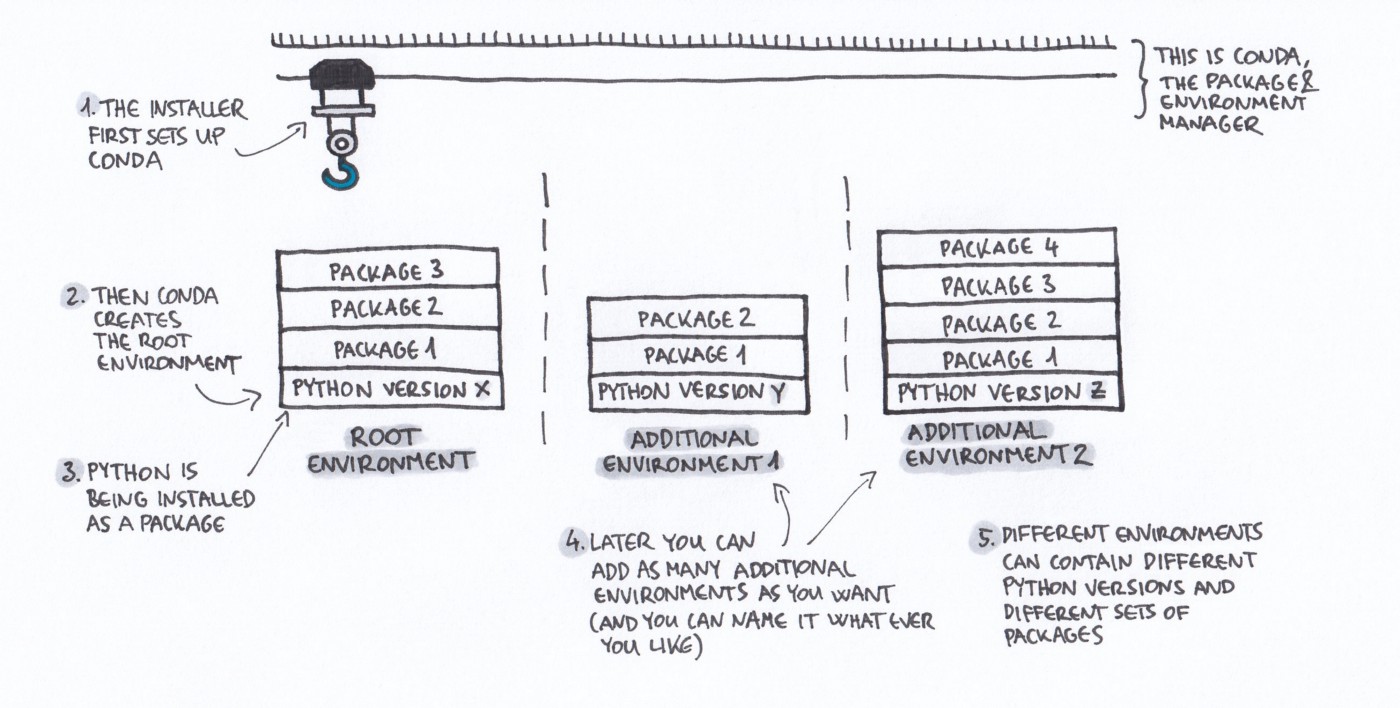
Conda
This section is from the CodeRefinery lesson on Reproducible Research.
![]()
- Created by Continuum Analytics, part of Anaconda/Miniconda but can be installed standalone.
- Open source BSD license.
- Installs binary conda packages.
- Manages isolated software environments.
-
Allows you to create and share conda packages.
Conda as a package manager
With conda it is easy to list, search for, install, remove and update packages. We can list all currently installed packages:
$ conda list
Let’s say we want to install Snakemake. We begin by searching for it:
$ conda search snakemake

Loading channels: done
No match found for: snakemake. Search: *snakemake*

PackagesNotFoundError: The following packages are not available from current channels:

  - snakemake
...
Hmm, it’s not available from our current channels. What are those? Let’s have a look at the configured channels:
$ conda config --get channels

--add channels 'defaults'   # lowest priority
--add channels 'conda-forge'   # highest priority
Ok, so we might need to look into other conda channels. This we can do
either via Anaconda Cloud or through
the anaconda command:
$ anaconda search snakemake

Using Anaconda API: https://api.anaconda.org
Packages:
   Name                      |  Version | Package Types   | Platforms       | Builds
   ------------------------- |   ------ | --------------- | --------------- | ----------
     bioconda/snakemake        |    5.4.3 | conda           | linux-64, noarch, osx-64 | py34_1, py34_0, py36_1, py36_0, py36_2, 0, 2, py35_2, py35_0, py35_1
...
     bioconda/snakemake-minimal |    5.4.3 | conda           | linux-64, noarch, osx-64 | py36_1, py36_0, py_0, py_1, py_2, py35_0, py35_1
...
We see that Snakemake is available in the bioconda channel. But we also
see that there’s an alternative package called snakemake-minimal.
What’s the difference? Let’s search for snakemake-minimal
in the bioconda channel, display it’s information, and compare it to
the full snakemake package. We’ll also limit ourselves to version 5.4.3:
$ conda search -c bioconda snakemake-minimal=5.4.3 --info

snakemake-minimal 5.4.3 py_0
----------------------------
...
dependencies:
  - appdirs
  - configargparse
  - datrie
  - docutils
  - gitpython
  - jsonschema
  - psutil
  - python >=3.5
  - pyyaml
  - ratelimiter
  - requests >=2.8.1
  - setuptools
  - wrapt
What about the full package?
$ conda search -c bioconda snakemake=5.4.3 --info

snakemake 5.4.3 0
-----------------
...
dependencies:
  - aioeasywebdav
  - boto3
  - dropbox >=7.2.1
  - filechunkio >=1.6
  - ftputil >=3.2
  - google-cloud-storage
  - jinja2
  - jsonschema
  - networkx >=2.0
  - pandas
  - psutil
  - pygraphviz
  - pysftp >=0.2.8
  - python-irodsclient
  - snakemake-minimal 5.4.3.*
So we see that snakemake contains several additional packages compared to snakemake-minimal.
We can now install it via:
$ conda install -c bioconda snakemake-minimal
If we want to update the package to the latest version:
$ conda update snakemake-minimal
and if we later want to remove it:
$ conda remove snakemake-minimal
Conda as an environment manager
- Our colleague emails us a code which depends on specific versions of several packages.
- We have some of the packages installed but not in the right versions.
- Can we create an isolated environment to run the code, without breaking other software we have installed?
Conda allows us to create isolated environments for different software projects. For simplicity’s sake, let’s say our colleague is using pandas version 0.20.3, while we have pandas 0.24.1. We create a new conda environment, and specify the versions of pandas:
$ conda create -n pd20 pandas=0.20

## Package Plan ##

  environment location: /Users/ktw/anaconda3/envs/pd20

  added / updated specs:
    - pandas=0.20

The following packages will be downloaded:
...

# To activate this environment, use
#
#     $ conda activate pd20
...
We activate the environment, and double-check that we have the correct versions:
$ conda activate pd20

(pd20)$ python -c "import pandas ; print(pandas.__version__)"
0.20.3
To list all environments, use the info subcommand:
$ conda info -e

base                     /Users/ktw/anaconda3
pd20                  *  /Users/ktw/anaconda3/envs/pd20
Reproducibility
Specifying a single version number of a package is simple, but for increased control, portability and reproducibility, we should use a file (in yaml or txt format) specifying packages, versions and channels needed to create the environment for a project.
Conda can generate this file for you, in one of two ways:
$ conda env export > environment.yml      # exports in yaml format
$ conda list --export > requirements.txt  # exports in simple text
- The environment/requirements file should be tracked in the same repository as the source code!
In the word-count project used in earlier episodes there is a simple requirements file, and we can create a new conda environment based on it:
$ conda create -n word-count --file requirements.txt
...
$ conda activate word-count
Using conda to share a package
Conda packages can be built from a recipe and shared on anaconda.org via your own private or public channel, or via conda-forge.
- conda-forge is a GitHub organization containing repositories of conda recipes.
- Has become the de facto standard channel for packages.
- Several continuous integration providers ensure that each repository (“feedstock”) automatically builds its own recipe on Windows, Linux and OSX.
A step-by-step guide on how to contribute packages can be found in the conda-forge documentation.
To get an idea of what’s needed, let’s have a look at the boost feedstock (a set of C++ libraries). We see that:
- Every commit is tested on every platform.
- There’s a list of maintainers.
- There’s a meta.yaml file under the
recipe/directory, along with (optional)build.shandbld.batfiles for building non-python code on OSX/Linux and Windows platforms.
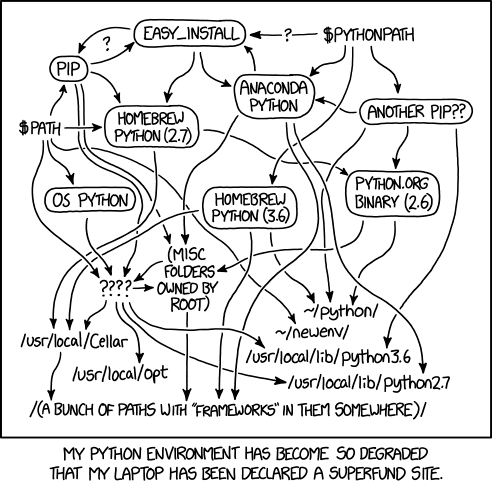
Conda vs pip vs virtualenv vs pipenv vs poetry…
-
Conda arose from the Python (PyData) community, but is designed to manage packages and dependencies within any software stack (less like pip, more like a cross-platform version of apt or yum).
-
When it comes to packaging and dependency management in Python (which can be rather convoluted and hard to understand) many alternative tools exist.
| Tool | Purpose | Comments |
|---|---|---|
| pip | Python package installer | Can be used with conda. |
| virtualenv | Tool to create isolated Python environments | Partly integrated into standard library under venv module. |
| pipenv | Python package and virtualenv management | Official PyPA recommendation, combines functionality of pip and virtualenv. |
| poetry | Handle dependency installation, building/packaging of Python packages | Competitor to pipenv. |
Learn to write Software documentation with CodeRefinery
We use CodeRefinery lesson on code documentation.
Questions
- Is project documentation important? Why?
- How would you describe a useful documentation?
- How can you motivate your colleagues to contribute to the documentation?
- Does your project have a website? If not, do you think it could be good for the project?
Why is project documentation important?
- You will probably use your code in the future and may forget details.
- You may want others to use your code (almost impossible without documentation).
- You may want others to contribute to the code.
- Shield your limited time and let the documentation answer FAQs.
Software documentation in practice
Good resources
DevOps and automation
In this section we will be using CodeRefinery lesson on DevOps and Automation.
Key Points
software license
pypi
conda
Software documentation
DevOps and automation